
In our last lesson, we introduced simple HTML elements like headings and paragraph tags. In this lesson, you will learn how to customize the appearance of heading text and paragraph text using style attributes.
The goals of this lesson:
1. Learning parts of an HTML attribute
2. Learning the following 5 attribute Properties and Values: Font Color, Font Size, Font Weight, Font Family, Text Align.
An HTML attribute is a way to improve the appearance of the content on our web pages. In this lesson, we will describe HTML elements that have one or more attributes attached to them. HTML Attributes are used to modify HTML elements. We will use the Style Attribute to customize the appearance of the text in our headings and paragraphs.
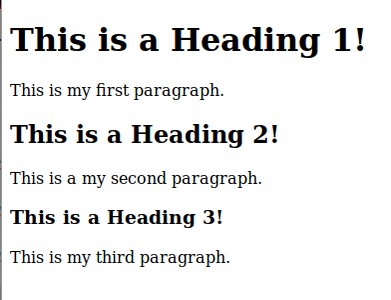
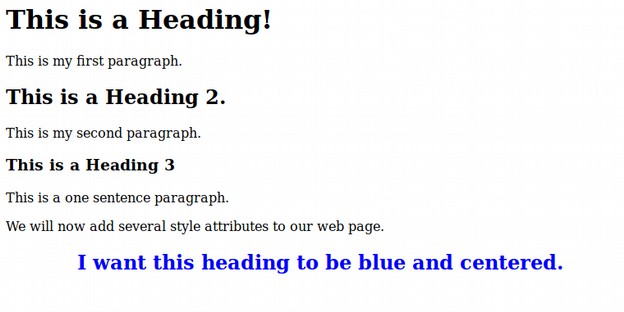
What happens to the appearance of elements if you do not use attributes to modify them? Attributes are usually optional because browsers have their own preset automatic attributes they will apply to define the appearance of elements. But the style applied by the browser is can be improved. For example, at the end of the last lesson, we created three heading elements and three paragraph elements.
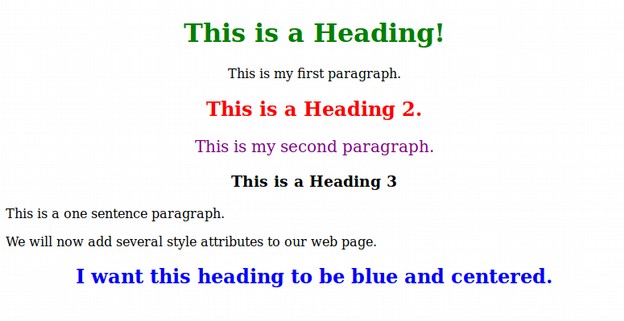
This looks pretty boring. You website will look much more interesting if you can change the color and size of your elements to make it look like this:
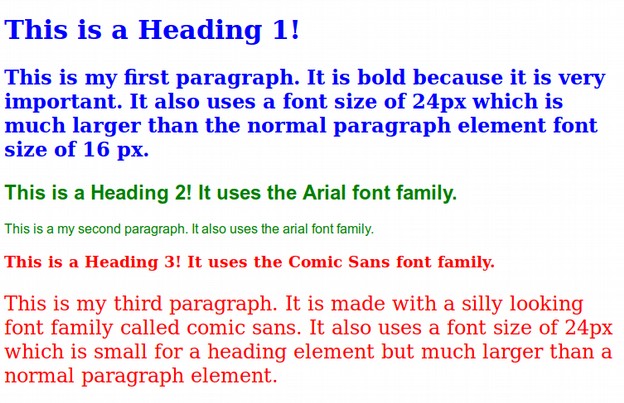
In the above example, we used the Bluefish editor to add the style attribute to various elements in order to change the font-color, font-size, font-weight and font-family of these elements. Here is what the above web page looks like in our Bluefish editor.
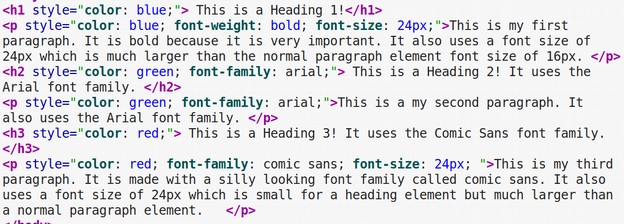
Note that with each heading and paragraph element, the style equals attribute is placed inside of the opening tag. The style equals attribute then has the properties and values placed inside of quotation marks. After this, there is the content or text that appears in the web browser.
Parts of an HTML Attribute
An HTML attribute has 6 parts:
#1 Element
#2 Attribute Name
#3 Equals Sign
#4 Quotation Marks
#5 Property Name (s)
#6 Property Value (s)
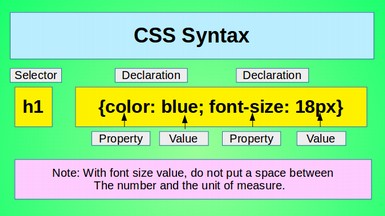
The first part is the html element that is being modified (such as the paragraph element). The next three parts are the attribute name, (such as the word style) followed by an equals sign (=) followed by quotation marks. Inside the quotation marks there is a property name, such as color, followed by a colon. Then there is a property value, such as blue, followed by a semi-colon. If you had a second property and value you wanted to add, these would also be placed inside of the quotation marks.
Look closely at the following examples and see if you can find all six parts for each of the two examples.
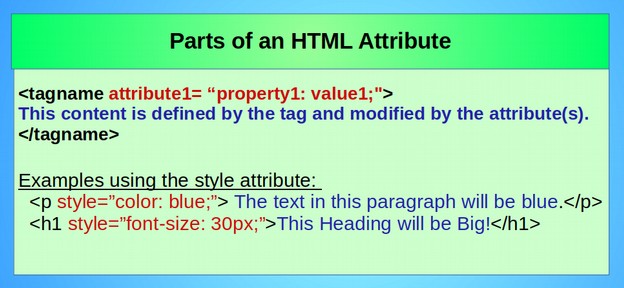
It is important to note that the entire attribute including property and value, goes inside of the opening tag of the element we are modifying right after the tag name and before the ending or right angle bracket. For example, if we want to modify the color of the text in a particular paragraph, the opening tag would look like this: <p style=”color: blue;”>
Using the style attribute to define the appearance of a particular element, such as a particular heading or a particular paragraph, can be useful when you want an element to appear differently from the other headings and paragraphs around it. Style attributes will over-ride the default style settings in your web browser. Thus, understanding how to use the style attribute will give you full control over the appearance of the content on your website.
Font or Text Color Property Value options
There are about one hundred CSS color options that use standard words for color like blue, green or red. Here is a link to a complete list of available colors in alphabetical order. https://www.w3schools.com/cssref/css_colors.asp
Here are some of the most common colors. Note that the names have no spaces: blue, darkblue, darkgreen darkred, darkviolet, forestgreen, gold, gray, green, lightblue, lightgray, lightgreen, lightpink, mediumblue, mediumpurple, orange, pink, purple, red, silver, skyblue, violet, yellow.
Font-size Property Value options
Font size refers to the size of each letter in a word. There are many ways to define font sizes. In this class, we will use the most common way which is pixels. If you do not change the font size, most browsers will use the following default or automatic font size values:
h1: 32px
h2: 24px
h3: 18px
p: 16px
Font-weight Property Value options
The two most common font weight options are normal and bold. All browsers use bold as the default or automatic style for heading elements and normal as the default value for paragraph elements.
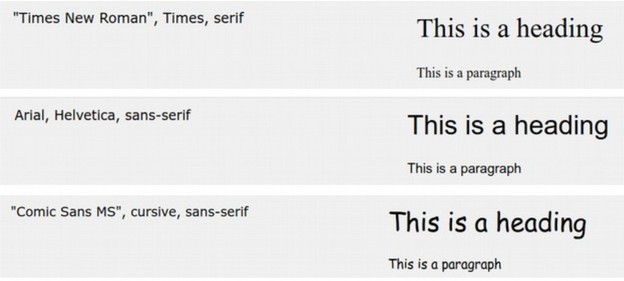
Font family Property Value options
Font families define the general appearance of fonts including how much fonts are decorated. Fonts with a lot of decorations are called Serif font. Fonts that look more plain are called San Serif fonts. The word San means “without.” If you do not define your own font family, most browsers will display your text using the Times New Roman font family. Three of the most common font families are Times New Roman, Arial and Comic Sans. Here is what these three fonts look like for heading and paragraph elements:
Now that you know why it is important to learn style attributes, let’s take a closer look at the parts of a style attribute so that you can start making your own style attributes.
Using the Bluefish Editor to Insert Inline Styling Attributes
Now that we understand the Style Equals attribute, let’s use the Bluefish editor to put this theory into practice. Open your file manager and open your My First Website folder. Then right click on your index.html file to open it with your Bluefish editor. Place your cursor at the end of the last paragraph closing tag. Then press Enter to create a new line. Type a left angle arrow followed by the letter p. Select the paragraph tag pair and press Enter on your keyboard to place this tag pair on line 14. Then carefully place your cursor between the opening and closing tag and type:
We will now add several style attributes to our web page.
After the paragraph closing tag, press Enter to create a new line 15 and type a left angle bracket followed by h2. Select the h2 tag pair and press Enter. Then place the cursor between the tags and type:
I want this heading to be blue and centered.
Place your cursor just to the right of the opening tag h2. Then enter a space with your keyboard. Start typing the word style. This screen will appear:

Just press Enter and the style attribute will be magically placed inside of your tag just where we want it. The style equals attribute inside of the opening H2 tag looks like this: <h2 style=””>

Then carefully place your cursor inside of the two parentheses and begin typing the word color (Bluefish will help you by bringing up the word color). Just press enter when you see this word. Bluefish will not only enter the word color, it will also add the colon we need. Then start typing the word blue. Select the word blue when you see it and press Enter. Bluefish will not only add the word blue but also insert the semi-colon.

To center the text, press the space bar on your keyboard to create a space after the semicolon. Then start typing the word text.

When you see the text-align property, press Enter. Then start typing the word center. A magic box will appear with the word center already selected. Press Enter.

Save the file and open it in a browser.
Remember that the best way to learn something is to do it three times. So let’s repeat this process with the heading 1 element only this time make the heading green and centered.

Now for the next heading 2, make it red and centered:

Add Attributes to a Paragraph Tag
We can add attributes to paragraph tags in the same way we added them to our heading tags. On line 11, carefully place your cursor inside of the opening paragraph tag after the letter p. Enter a space. Then start typing the word style. When the style attribute pops up, press Enter. Then start typing the word color. When the color property pops up, press Enter. Then start typing the word purple. When the purple value pops up, press Enter. Then start typing the word font. When the font-size property pops up, select it. Then press Enter. Then type in 20px followed by a semi-colon. Then start typing the word text. When the property text-align pops up, press Enter. Then start typing the word center. When the value center pops up, press Enter. Then click File Save and then click on the blue globe to view the page in your browser:
Things are looking better.
What’s Next?
This concludes our introduction to the Style Attribute. In the next lesson we will learn how to add images to our website.